
The BrailleDoodle!
The Braille Side
Directions for Use or ‘The First Braille Lessons’
Please note that these instructions are to be used as a general guide. Once understood, lessons can be modified to match the teacher’s instruction and the student’s learning styles.
The time students take to master each of the following steps will vary greatly. Efforts should be made to note each student’s pace of learning and adjust instruction accordingly. For example, some students may only learn 2 to 4 letters at a time.
Be sure to pile on lots of praise!
PART ONE
Step one – Learn to raise and ‘erase’ the dots
Place the BrailleDoodle with the Braille Side in front of the learner and put the stylus in their dominant hand. The bottom has a triangular grip to help those not accustomed to holding a pen. Still, you may have to guide the learner to pinch the grip and let the top of the stylus drop between the pointer finger and thumb.
Explain how the stylus raises the dots while the other hand feels them as they work. Move around the surface, practicing raising and pushing various dots back down. Tell the learner that the stylus requires no pressure to make the dots, and touching creations should always be done gently and simultaneously with their free hand.
NOTE: Have the learner get in the habit of occasionally putting aside the stylus and feeling their work on the BrailleDoodle using both hands. Explain how reading is always done with both hands.
Step two– Identify the dot numbers
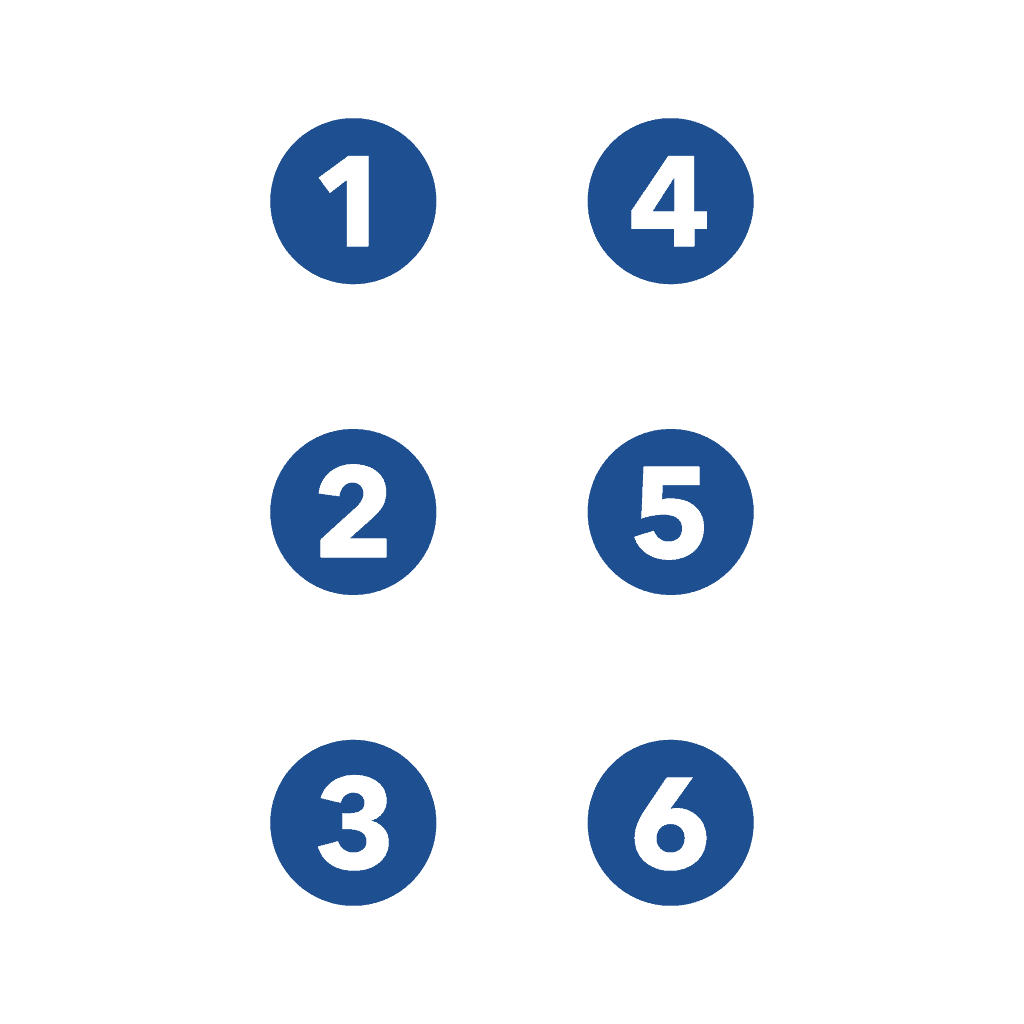
Put the stylus aside, and starting in the upper left-hand corner, using hand over hand, have the learner feel the first braille cell and have them be able to count the dots in the assigned order. Explain – “The braille cell is comprised of six dots arranged in two columns and three rows. Each dot has a number 1 through 6. Beginning in the top left corner of the cell is dot 1. Moving down are dots 2 and 3. In the top right corner is dot 4. Then, moving down the right column are dots 5 and 6.”
Step three– Practice the dot numbers.
Have the learner move to the second cell, the ‘Practice Cell,’ where all the dots function, and have them lift the numbered dots you instruct them to. “Lift, dot one. Good, push it back down.” “Lift dot 5. Good, push it back down.” “Lift dots one and three. Good, push them back down.” and so on. Practice all dots and some combos, then move to the bottom rows of 19 smaller braille cells and practice by continuing the exercise across the bottom.
NOTE: The learner may benefit from having the instructor isolate the cells where the learner works by using their hands or some form of guide. The guide can be made by cutting a rectangular hole in an index card or thick paper. Fold the paper in half and toward the center, making two small cuts down and one across. Then, when you unfold the paper, you will have your guide.
PART 2
Step four – Start Learning the Braille Letters
First- Guide the learner back to the top cell in the upper-left-hand corner and explain that the first letter they will make is “A.” Have the learner identify the dots and then “discover” with the stylus that dot 1 is the only one that functions. (Always use the two-hand method, one hand creating with the stylus and the other feeling as they go.)
Second- Have them examine this cell closely while they say the letter ‘ay’ aloud. (This is a multisensory learning technique that increases retention.)
Third- Have the learner form an ‘a’ in the practice cell and have them make sure it matches. Mistakes can be fixed right away by pressing down on the dots. Again, they should say ‘ay’ aloud and repeat these steps several times.
Fourth- Have the learner put the stylus aside and use both their hands. The letter ‘a’ in standard-sized braille is below the practice cell. Have the learner discover how the jumbo braille Cells above and this standard-size braille feel similar.
Fifth- The learner can move down to the rows of braille cells below the alphabet and be instructed to make 19 ‘a’s across.
Sixth- Put the stylus aside and have the learner feel their creation. Be sure to emphasize proper finger placement and tracking. A video that explains how to teach this well is available. Click on the text below, HERE, or Google “YouTube Braille Tracking Techniques.”
Lastly, guide the learner’s hand down to the rows of standard-size braille letters at the bottom of the device. Help the learner find the letter “A” in the row with the alphabet and then in the row below that has the sentence, “The quick brown fox jumps over the lazy dog.”
NOTE: For younger children, one should emphasize the phonics of each letter heavily. Sounds and words that start with that sound should be repeated: ‘A’ for ape. ‘A’ for apple, etc.
PART 3
Step 6. Complete the alphabet
-
Repeat step four until the letters A through J are mastered. Learners may write different letters or combinations in the lines below. Then, introduce the braille patterns to complete the alphabet.
NOTE – Most braille instructors introduce the following braille patterns in this order:
Explanation of the chart below.
ROW 1 – A through J uses only the top four dots (Positions 1, 2, 4, and 5). The same patterns also represent numbers 1 through 0, but a number sign is used before them to indicate they are numbers.
ROW 2 – K through T are similar to A through J but with an extra dot in position 3
ROW 3 – This line includes the letters U through Z. These letters are similar to K through O but with an additional dot in position 6.
NOTE: There was no “W” in the French alphabet when Louis Braille invented it. Therefore, it was added later.

PART 4
Step 9. Understand contractions for sight words
And
For
Of
The
Introduce “with”
PART 5
Step 7. Understand the capital and number indicator
These steps will be continued with some of the following lessons:
Learn how the capital indicator works. (Shown after the letter ‘z’)
Skip to the How to Write Capitals Video.
Step 8. Understanding number sign # (aka the number indicator)
Learn how numbers are written and read.
Skip to the Reading and Writing Numbers Video.
PART 6
Step 10. Begin forming three-letter words
Start with 3-letter, rhyming words: cat, sat, fat, mat.
Form short sentences. “The fat cat sat on a mat.”
Form longer words and sentences.
Detailed description or “Alt text” to explain the BrailleDoodle:
The BrailleDoodle is a two-sided tablet designed for braille learning and creating tactile images. The dimensions resemble that of a standard laptop, and it is constructed with durable dark blue plastic.
MEASUREMENTS
– Length: 12.8 inches (325 mm)
– Width: 9.25 inches (235 mm)
– Thickness: 1.1 inches (27 mm)
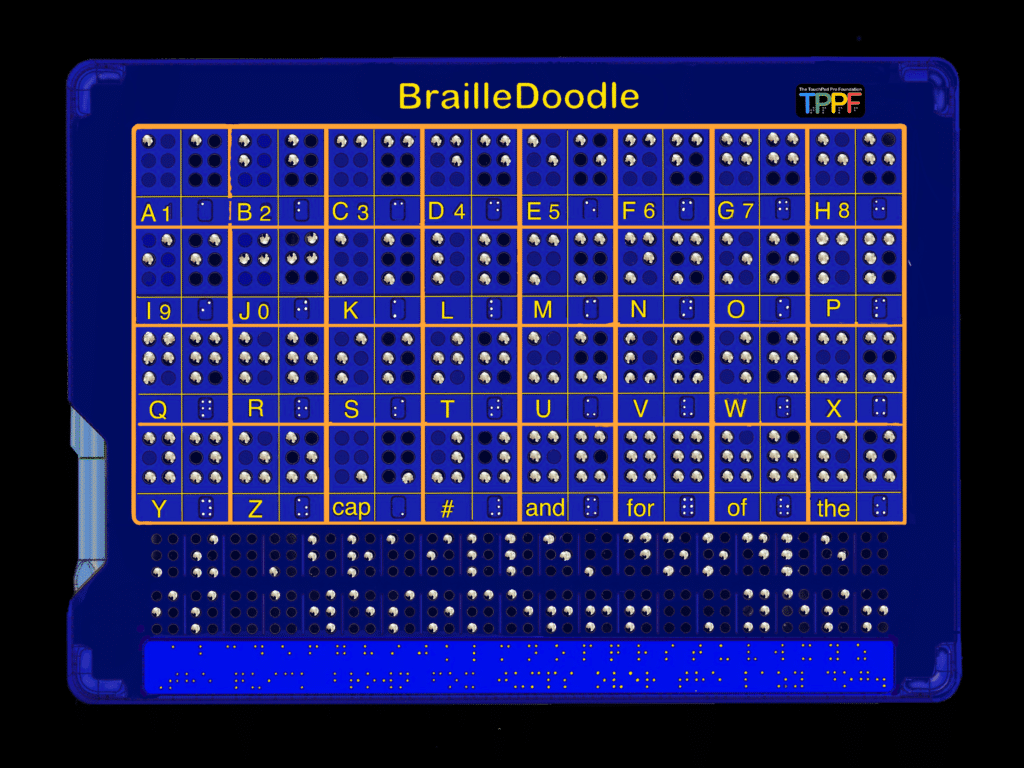
On its front side, the ‘Braille Side,’ the word “BrailleDoodle” is centered in yellow, and the TPPF logo is positioned to the right. This side is adorned with an array of holes arranged in two sizes of Braille cells. Each hole contains a tiny metal ball that can be raised to the surface using a magnetic stylus and securely locked in place, creating a tactile effect. The magnetic stylus is stored in a slot on the side, tethered to the BrailleDoodle via a spring cord.
Prominently featured are four rows of eight rectangles, each demarcated by substantial tactile ridges, housing examples, and practice spaces for each individual letter. In the ‘Example Braille Cell,’ only the holes relevant to that specific letter are functional, allowing learners to repeatedly create that particular letter as an example. Adjacent to it, within the ‘Practice Braille Cell,’ learners can refine their skills by using the six operative holes situated beside it to practice that letter. Complementing the Braille Alphabet, there is also the capital indicator, the number indicator, and the words ‘and,’ ‘for,’ ‘of,’ and ‘the’ presented in Braille.
Directly beneath each ‘Example Braille Cell,’ letters and words are rendered in yellow print. Underneath each ‘Practice Braille Cell,’ the Braille letter is displayed in standard size on a raised rectangle. The four sections are divided by slender tactile lines. The Braille cells in the upper section feature larger holes and metal balls for enhanced legibility.
Beneath the Braille alphabet, you’ll find two rows of 19 Braille cells separated by fine ridges. These smaller holes and metal balls are configured in 6-dot clusters, facilitating the composition of complete words and sentences. In this picture, in Braille, a sentence reads, “The BrailleDoodle is awesome!!! Yes!”
Located beneath these two lines of Braille cells is a recessed rectangle extending the length of the BrailleDoodle. The top row presents each standard-size Braille letter with appropriate spacing, while the row below showcases the famous sentence encompassing every letter: “The quick brown fox jumps over the lazy dog.” This arrangement enables users to acquaint themselves with standard Braille in both word and sentence formats.
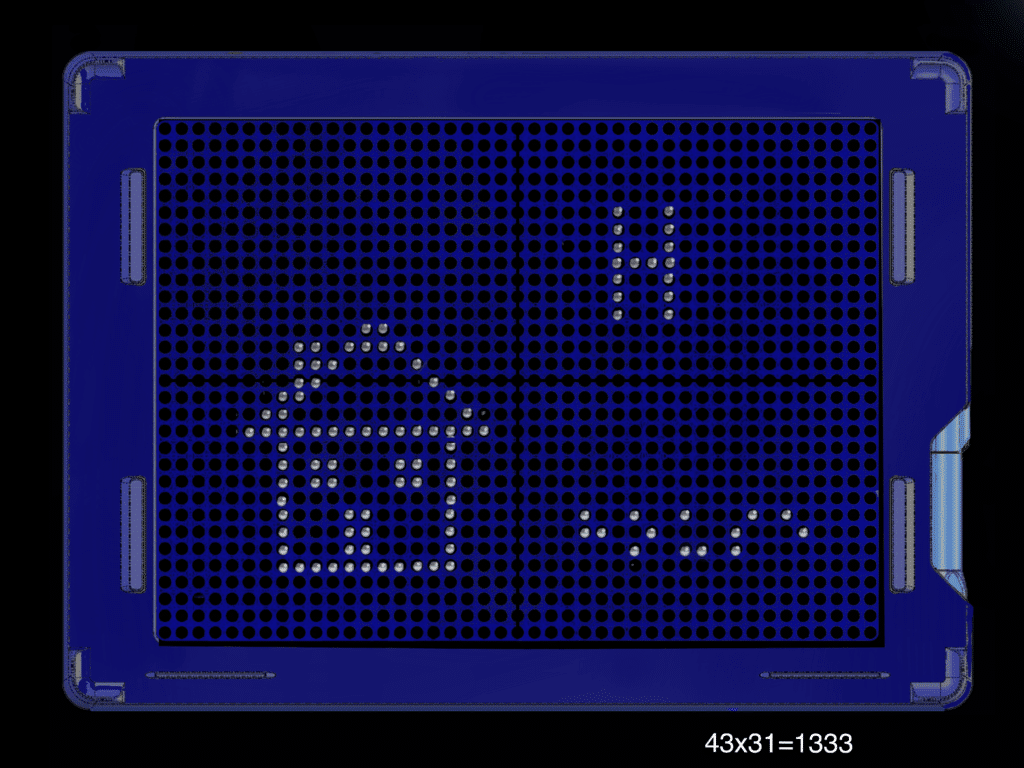
Turning to the “Doodle Side,” an array of 41 by 31 holes awaits exploration, totaling 1333 dots in all. Each ball, when raised, maintains a consistent distance of 6 mm from center to center. As depicted in our primary image, the surface is adorned with raised silver dots, creating tactile representations of a house, a capital letter ‘H,’ and the word ‘house’ in Braille.
In the near future, the BrailleDoodle will introduce a range of specialized cover options that serve as stencils. The BrailleDoodle features four notches, two on each side of the doodle surface, securely holding these flat covers in position. These flat covers will encompass guidance in various aspects, including Braille music, Braille math, contractions, shapes, graphs, art, and Braille in multiple languages.
The stylus is 4.6 inches (117mm) long and has a rounded magnet on one end and a hole for the tether on the other. It is shaped like a thick pen and is .5 in (13mm) wide at its widest point. The bottom has a triangular grip to help those not accustomed to holding a pen. Just pinch the grip, and you are holding it correctly.